Showing posts with label barbie clothes. Show all posts

Saturday 6 October 2018

Barbie fluffy jacket

I love the fluffy jackets that are so popular just now.  I found a small amount of cream fluffy yarn in my stash which was just right for this jacket.

Its a very easy pattern knit in garter stitch throughout (thats every row knit), with the sleeves knit first then the back and front in one piece.  The sleeves are joined in after the armhole shaping to knit the yoke.  There's only one small sleeve seam to sew.

The jacket will fit all barbie dolls.  My model is Curvy Fashionista Barbie

The trousers and top can be found on my site here
Trousers and top


Materials:
Approx 20g of fluffy double knitting yarn, (I used Sirdar Snuggly snowflake in cream)
Needles size 4mm, 1 Small button
Tension:  26sts x  32 rows, using 3.75 needles, garter stitch over 4”


Sleeves (make 2)

Using 4mm needles cast on 16sts
Work 16 rows gs
Next row:  cast off 2sts at beginning of next 2 rows. (12sts)
Fasten off yarn and leave 12sts on holder

Main Body (worked in one piece to armhole) Top of sleeves are knit in with yoke

Using 4mm needles cast on 40sts
Work 25 rows gs
Next row:  (wrong side) k9, cast off 4sts, k14, cast off 4sts, k to end. do not fasten off yarn

Yoke

With right side facing, slip all sts onto left hand needle in following order:  9sts of left front, 12sts of sleeve, 14sts of back, 12sts of sleeve, then 9sts of right front. (56sts)

The next row begins at the right front, right side facing
Row 1:  k7, (k2tog) 2 times, k8 sts, (k2tog) 2 times, k10, (k2tog) 2 times, k8, k2tog) 2 times, k7   (48sts)
Row 2:  (wrong side) knit
Row 3:  k2tog, yf, (buttonhole) k4, (k2tog) 2 times, k6 sts, (k2tog) 2 times, k8, (k2tog) 2 times, k6, (k2tog) 2 times, k6    (40sts)
Row 4:  knit
Row 5:  k5, (k2tog) 2 times, k4sts, (k2tog) 2 times, k6, (k2tog) 2 times, k4, (k2tog) 2 times, k5    (32sts)
Row 6:  knit
Row 7:  k4, (k2tog) 2 times, k2, (k2tog) 2 times, k4, (k2tog) 2 times, k2, (k2tog) 2 times, k4   (24sts)
Work 12 rows in gs for collar.   Cast off loosely.

To Finish  

Join underarm and sleeve seams and fasten off ends.  Sew small button at front to correspond with buttonhole

Slip stitch centre of collar down at centre back


Monday 30 July 2018

Curvy Barbie trousers, shorts and top


More outfits for Curvy Fashionista doll made in 4ply yarn

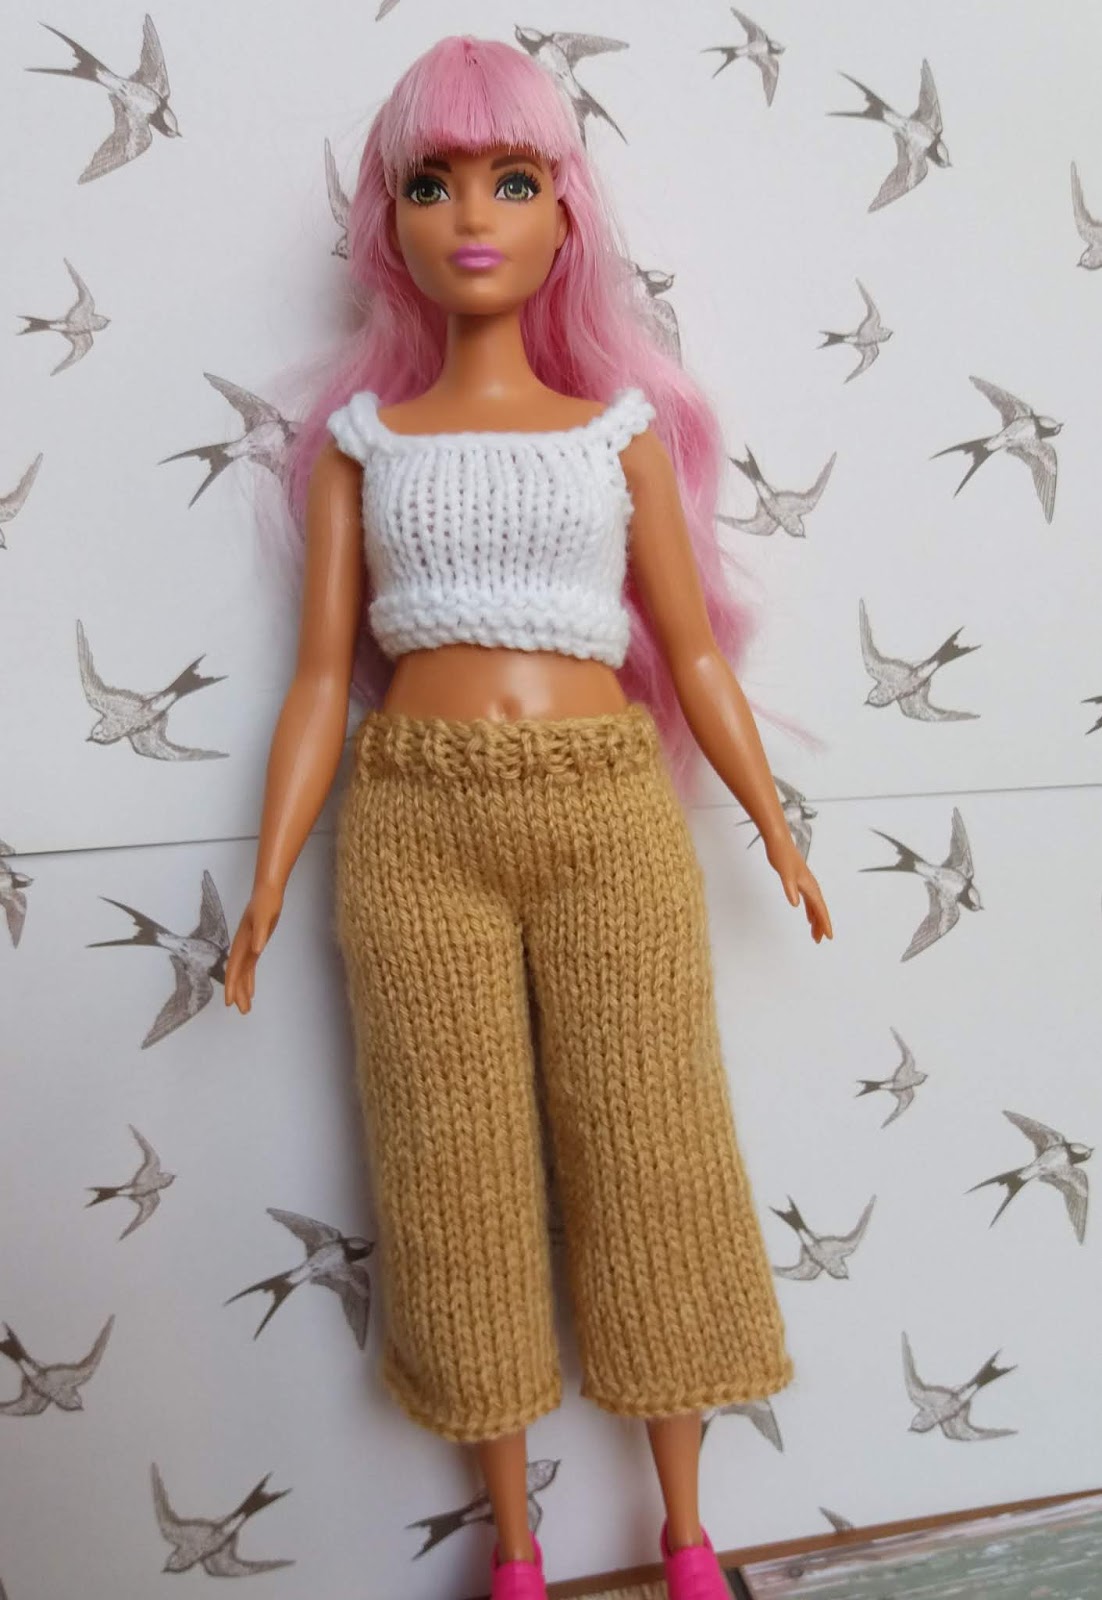
The trousers have a few styles, cut offs, shorts of any length you want and the current trend of wide mid length trousers that both my granddaughters seem to love.  I've done a rolled hem but feel free to do garter stitch or rib if you prefer

The top can be striped or plain and any length.  I made the white top a bit shorter than the rest - very trendy just now. 
And for good measure I added a skirt.  The block colour sweater looks great with the wide trousers and can be found on this site here

The trousers are made in the round and as Curvy Barbie needs a back fastening for a good fit, the top is made on single pointed needles.  As I've probably mentioned before I'm not a great fan of knitting in the round, (except for socks - I love socks) but must admit its so easy to make these little items this way.  I used circular needles using the magic loop method which work great but use whatever you prefer.
Not everyone uses dpns so I've added a section for those of you who prefer to use single points.


As always please let me know if you find any mistakes or have any problems with this pattern


To fit: 12” Barbie curvy Fashionista dolls
You will need approx 25g 4ply yarn in main for trousers and 10g for top
double pointed needles size 3.25 (US 3) and 3mm , 2 small buttons for top
Tension:  28sts and 36 rows over stocking stitch using 3.25 needles

Abbreviations:
beg: beginning, sts: stitches, yf: yarn forward, rep: repeat, ss: stocking stitch, tog: together, k: knit, p: purl, dec: decrease, ssk: slip next 2sts onto right hand needle, insert left hand needle through front loops and knit both sts off tog.(you can also slip 1, knit 1, pass slipped st over)  kfb: knit into front then back of same st, pfb:  purl into front then back of same st


Trousers

Knit from the waist down
With 3.25 dpns, (or circular needles) cast on 34sts, join into round (rounds start at centre back)
Knit 3 rounds k1, p1 rib
Rnd 1        increase:  k1, (kfb, k2) 5 times, k3, (kfb, k2) 5 times      44sts
Rnd 2         knit
Rnd 3         kfb, k to last 2sts kfb, k1                                              46sts  
Rnds 4-9    rep rounds 2 and 3,  3 times                                         52sts
Rnd 10-11  rep round 3,  2 times                                                   56sts
Divide for legs
Rnd 12       K28, slip next 28sts on holder

Continue for right leg
Join into round by k into first st, rounds now begin at inner leg
*Rnd 13-20 Knit 8 rounds
Rnd 21       K2tog, k to last 2sts, ssk
Rnds 22-24 Knit 3 rounds
Repeat last 4 rounds to 18sts.
Knit 3 rounds 
Cast off loosely

Left leg
Rejoin yarn to remaining 28sts at front of trousers
Knit to end and join into a round
Continue as right leg from *

To Finish
Fasten off all ends.  Sew any gaps from the joining of legs

Shorts/straight trousers

As trousers to *
Knit 8 rounds for shorts
Knit 34 rounds for straight trousers
Or length you want allowing 3 rnds for turn up.
For no turn up light press hem to flatten
Finish as trousers

Top
With 3mm single point needles and main, cast on 34sts
Knit 3 rows garter stitch
Change to 3.25 spns
Row 1     change to contrast, buttonhole row, knit to last 2sts, yf, k2tog knit
Row 2     k2, purl to last 2sts, k2
Row 3     using main, knit
Row 4     k2, purl to last 2sts, k2
Row 5     using contrast knit
Row 6     using contrast k2, purl to last 2sts, k2
Row 7-12  following stripe pattern repeat rows 5 and 6,  3 times
Fasten off contrast
Row 13     using main, k8, cast off 3sts, k12 (includes st on right hand needle) cast off 3, k6, yf, k2tog
Row 14     k2, p6, cast on 9sts, p12, cast on 9sts, p6, k2
Row 15     k6, k2tog, k across 9 cast on sts, k2tog, k8, k2tog, k across 9 cast on sts, k2tog, k6
Cast off loosely purlwise.   
Sew on small buttons to match buttonholes


Skirt

Knit from the waist down
With 3.25 dpns, cast on 34sts, join into round (rounds start at centre back)
Knit 3 rounds k1, p1 rib
Inc rnd      (k1, kfb) to end                  51sts
Knit 10 rounds
Inc rnd      (k1, kfb) to last st, k1          76sts
Knit until work measures 3” (or length required)
Knit 4 rounds in garter stitch for hem
Cast off loosely

Fasten off ends
Press hem lightly to flatten


To make on Single pointed needles


Trousers
Knit from the waist down
With 3.25 needles, cast on 34sts, rows begin at centre back
Knit 3 rows k1, p1 rib
Row 1    k1, (kfb, k2) 5 times, k3, (kfb, k2) 5 times             44sts
Row 2    purl
Row 3    kfb, k to last 2sts kfb, k1                                      46sts  
Rows 4-9    rep rounds 2 and 3,  3 times                            52sts
Row 10  pfb, p to last 2sts pfb, p1                                      54sts
Row 11  as row 3                                                              56sts
Divide for legs
Row 12   p28, slip next 28sts on holder

Continue for right leg
*Row 13-20  beg with knit ss 8 rows
Row 21         k1, K2tog, k to last 2sts, ssk, k1
Rows 22-24  beg with purl row, ss 3 rows
Repeat last 4 rows to 18sts.
Knit 3 rows ss
Cast off loosely

Left leg
Rejoin yarn to remaining 28sts at front of trousers wrong side facing
purl to end
Continue as right leg from *

To Finish
Sew legs seams and back seam using mattress stitch
Fasten off all ends

Shorts/straight trousers
As trousers to *
Knit 8 rows for shorts
Knit 34 rows for straight trousers
Or length you want allowing 3 rows for turn up.
For no turn up light press hem to flatten
Finish as trousers

Skirt
Knit from the waist down
With 3.25 needles, cast on 34sts (rows start at centre back)
Knit 3 rows k1, p1 rib
Inc row      (k1, kfb) to end                  51sts
Beg with purl row, work 9 rows ss
Inc row      (k1, kfb) to last st, k1          76sts
Ss until work measures 3” (or length required)
Knit 4 rows in garter stitch for hem
Cast off loosely

sew seam using mattress stitch
Fasten off ends
Press hem lightly to flatten


Thursday 5 April 2018

Curvy Barbie crochet shorts and top


I've amended my barbie shorts pattern on this site to fit the lovely Curvy Barbie.  Plus added a new top with a trendy frill across the shoulders.

I used Patons Soft cotton 4ply from my stash but any 4ply would do.  Both the shorts and top can easily be lengthened by adding a few more rows.
I use UK crochet terms for a conversion chart click here
crochet conversion chart

If you have any problems with this pattern please leave a comment below or contact me.


To fit: 12” Curvy Fashionista Barbie
You will need approx;   10g 4ply yarn for shorts and 10g 4ply yarn for top.
Crochet hook no 3.5
Tension: (Gauge) 24sts x 26 rows to 4” over dc using 3.50 hook
Abbreviations: Dc: double crochet (US single crochet), tr: treble crochet, (US double crochet) ch: chain, slst: slip stitch, inc: increase, rnd/s: round/s


Shorts


Make 34ch
Rnd 1        dc around
Rnd 2        2dc in next dc, dc32, 2dc in next dc                   36sts
Rnd 3        dc around
Rnd 4        2dc in next dc, dc34, 2dc in next dc                   38sts
Rnd 5        dc around
Rnd 6        2dc in next dc, dc17, (2dc in next dc) 2 times, dc17, 2dc in next dc    42sts
Rnd 7        dc around

Divide for legs

Right leg
Rnd 1        dc 21, place a marker in 1st dc, 4ch, dc in 1st dc with marker to join into round for right leg
Rnd 2        dc around working 1dc in each of 4ch   25sts
Rnd 3:       dc to last 2sts, miss 1dc, dc1               24sts
Rnd 4–5:     dc around
Fasten off yarn

Left leg
Rnd 1        4ch, dc in next dc on front of shorts, dc20, dc in 1st ch to join into round
Rnd 2        dc around working 1 dc in each 4 ch space   25sts
Rnd 3        dc to last 2sts, miss 1dc, dc1                       24sts
Rnd 4–5    dc around  
Fasten off yarn

Work a round of 26dc in waist of shorts.
Sew cast on sts seam together and fasten off all ends

Top

Make 30ch
Work 8 rounds dc - shorten or lengthen here

Shape armholes
Dc6, 5ch, miss 4dc, dc 10, 5ch, miss 4dc, dc 6      22sts
Turn and work in rows:

1ch (doesn’t count as st) dc in back loop only of next 6dc, 1dc in each 5ch, dc10 in back loop only, 1dc in each 5ch, dc in back loop only in next 6dc, slst in top of 1st dc, to join, turn
frill
3ch, (1tr, 2tr in next tr) to end,  slst in top of 3ch, turn
3ch, (2tr, 2tr in next tr) to end, slst in top of 3ch.  Fasten off yarn

fold last 2 rows to form frill and slip stitch in place at centre back
Fasten off all ends

Thursday 1 March 2018

Curvy and Tall Barbie Fashionista knitted dresses


These fashionista dolls are wonderful, they show that women come in all shapes and sizes and we are all are lovely.  I particulary like the curvy barbie because she is so realistic and who doesn't love pink hair!

So,  I've amended the barbie knitted dress on this site to fit the Barbie Fashionista doll's shape,  tall and curvy.  The patterns are written out separately as there's quite a difference in the sizing.

Both dresses are knit in one piece with a centre back seam, with no fastenings for Tall Barbie.  Pull on styles are difficult to dress on Curvy Barbie so this version has a centre back opening for an easy fit. 
I've used two contrast colours but any colour combination would work.

Both dresses can easily be made in the round, noting that the round begins at centre back. You will need to change to rows for the back opening. 

As always please let me know if you find any mistakes or have a query about this pattern. 

To fit: 12” Barbie Fashionista dolls Tall and curvy
You will need approx 25g double knitting yarn in main and 10g in each contrast
Needles size 3.25 (US 3) small button for curvy Barbie dress
Tension: 26sts and 32 rows over 4 in (stocking stitch) using 3.25 needles

Abbreviations: beg: beginning, sts: stitches, yf: yarn forward, rep: repeat, ss: stocking stitch, sl st, slip stitch, m1: pick up loop between sts and knit into back, tog: together, k: knit, p: purl, dec: decrease, ssk: slip next 2sts onto right hand needle, insert left hand needle through front loops and knit both sts off tog.(you can also slip 1, knit 1, pass slipped st over)


Tall Barbie dress

Main Body (work in one piece to armhole)
Using main colour cast on 31sts
Work 2 rows k1 p1 rib
Rows 1-24:   stocking stitch 24 rows
Row 25:        K6, k2tog, k15, k2tog, (29sts)
Row 26:        purl
Row 27:        k6, k2tog, k13, k2tog, k6 (27sts)
Row 28:        purl
Rows 29-30:  Join contrast A, work 2 rows stocking stitch
Rows 31-32: Join contrast B, work 2 rows stocking stitch
Row 33:        K11, m1,k1,m1,k3,m1,k1,m1,k11 (31sts)
Rows 34:36: work 3 rows ss

Armhole shaping
Row 37:        k6, cast off 3sts, k13, cast off 3sts, k6
Row 38:        p6, cast on 7sts, p13, cast on 7sts, p6
Row 39:        k4, k2tog, k7, k2tog, k4, k2tog, k3, k2tog, k7, k2tog, k4    34sts
Row 40:        purl
Cast off

To make up
Sew centre back seam using mattress stitch, fasten off ends


Curvy Barbie dress


Main Body (work in one piece to armhole)
Using main colour cast on 38sts,
Work 2 rows k1 p1 rib, inc 1st at end of last row               (39sts)
Rows 1-22:   stocking stitch 22 rows
Row 23:        K2, ssk, k10, ssk, k7, k2tog, k10, k2tog, k2 (35sts)
Row 24:        purl
Row 25:        K2, ssk, k9, ssk, k5, k2tog, k9, k2tog, k2     (31sts)
Row 26:        purl
Rows 27- 28: 2 rows ss
Rows 29-30:  Join contrast A, work 2 rows stocking stitch
Rows 31:       Join contrast B, cast on 2sts, k2 cast on sts, k14, m1, k3, m1, k14   (35sts)
Row 32:         k2, purl to last 2sts, k2
Rows 33-36:  work 4 rows ss keeping 2 knit sts at each end of purl row

Armhole shaping
Row 37: k9, cast off 3sts, k13, cast off 3sts, k7
Row 38: k2, p5, cast on 7sts, p13, cast on 7sts, p7, k2
Row 39: k7, k2tog, k7, k2tog, k4, k2tog, k3, k2tog, k7, k2tog, k3, yf, k2tog
Row 40: k2, purl to last 2sts, k2
Cast off

To make up
Sew centre back seam using mattress stitch. Sew on small button at back to match buttonhole. Fasten off ends

Tuesday 30 January 2018

Barbie Heart Sweater


As its nearly Valentines day, I've posted this heart sweater, which takes only 25g of dk yarn and a small amount of contrast. 

The front, back and sleeves are made to the armhole then the raglan shaping knit in one piece.  Its always a challenge to try and make these small items easy and less fiddly to knit and with this way there is only a smallish seam for one raglan and then the arm and sides can be sewn up in one seam.  When making the motif, use separate strands of pink yarn so you don't carry yarn across the motif.  When changing colour twist the yarn to avoid a gap.  If your new to block colour knitting (intarsia) try this tutorial  
Intarsia

I've designed this pattern to fit the basic Barbie but, as its a loose fit should also fit the new curvy fashionista doll.


As always, please let me know if you find any mistakes or have any queries.  


To fit : 12 in Barbie (latest model)
Materials: 25g pink and small amount red, double knitting yarn
Needles size 3mm, and 3.25  (US3), Small button
Tension: 28sts and 32 rows over 4 in (stocking stitch) on 3.25 needles
Abbreviations: k: knit, p: purl, ss: stocking stitch (one row plain, one row purl), inc: increase, dc: decrease, beg: beginning, sts: stitches, tog: together, psso: pass slipped stitch over  (or use ssk)

Front

Using smaller needles and pink, cast on 19sts
Work k1, p1 rib for 4 rows, inc 1 st at each end of last row (21sts)
Change to larger needles
Work chart A
Using pink, work 4 rows ss
Work chart B (11 rows)
Next row:  purl
Armhole shaping
Cast off 2sts at beg of next 2 rows    17sts
Leave sts on holder

Back

Work as front, excluding motif

Sleeves (make 2)
With 3mm needles and pink, cast on 16sts
Work k1, p1 rib for 4 rows
Change to 3.25 needles
Work chart A
Work 16 rows ss, inc 1 st at each end of 5th row (18sts)
Armhole shaping
Cast off 2sts at beg of next 2 rows    14sts
Leave sts on holder. Don’t fasten off yarn after second sleeve.

Raglan shaping

With right side facing slip sts onto left hand needle in the following order: 17sts back, 14sts first sleeve, 17sts front, 14sts second sleeve,  yarn should be at the beginning of row.   62sts

Row 1:    k1, sl,k1,psso, k9, k2tog, sl,k1,psso, k13, k2tog, sl,k1,psso, k10,  
              k2tog, sl,k1,psso, k12, k2tog, k1
Row 2:    purl
Row 3:    k1, sl,k1,psso, k7, k2tog, sl,k1,psso, k11, k2tog, sl,k1,psso, k8,  
              k2tog, sl,k1,psso, k10, k2tog, k1       
Row 4:    purl

Work 4 more rows decreasing as set to 30sts,  Don’t fasten off yarn and continue with neckband

Neckband

Change to 3.25 needles
Next row:  (k1,p1) 3 times, k2tog, (p1,k1) 2 times, p1, K2tog, (p1, k1) 3times, k2tog, (p1,k1) 2 times, p1, k2tog  26sts

Work 1 row k1, p1 rib.
Next row: (buttonhole row) k2tog, yf, rib to end
Cast off in rib.

To finish

Sew raglan seam with buttonhole to 1” of neck edge.
Sew side and sleeve seams, fasten off all ends
Sew on small button to correspond with buttonholes
neaten all ends


Chart A


Chart B